

If you can't already tell, I'm fascinated with the details of nature. As Yogi Berra said, "You can observe a lot by just watching." Even when I had a point and shoot camera, I loved to try my hand at macros. There's something fascinating to me about getting right in there and capturing the detailed perspective. Here's some advice for those getting started with SLR macro photography...
1. It's about the glass. There's no way around this, you really need a fixed-focal-length macro lens (not a zoom). The common length and speed for macro lenses is 100mm @ f/2.8. The longer the focal length, the easier it is to produce good bokeh --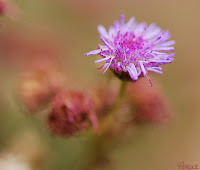 bokeh refers to the blurring of the background (I wrote more about this here). The creamier and smoother the background, the better the bokeh. Click on the flower to the right or see yesterday's post -- notice how the backgrounds are softly blurred. It is easier with the longer lenses (100mm, 150mm, 180mm) to produce better bokeh because the field of vision is narrower, making the background easier to control. I started out with a 60mm macro lens, and it was great, it's just that you pretty much had to shove the camera into whatever it was you were trying to capture (which made insect photography very difficult) and the wide focal length made it difficult to control the background. My advice, start out with a macro lens with a focal length of 90mm to 105mm.
2. Avoiding the shakes. You'll need a steady hand, lots of light, a quality flash, and still, lots and lots of patience to get sharp photos. Like I said, the good thing about "longer" lenses is better bokeh, the downside: it's much tougher to steady them. Almost every macro I've ever shot has been handheld -- and that's because I'm lazy and hate the hassle of setting up the tripod. Here are two of my tripod shots - here and here. (I use the tripod so infrequently with macro photography that I can remember which shots were taken using it!). In the absence of a tripod, you need a flash or decent light.
3. The wind is not your friend. It doesn't matter how solid your tripod is, if it's a windy day, it's futile trying to take macros (unless you're taking macros of things firmly rooted or secured!). Even the slightest whisp of a breeze will give you fits.
4. Getting deep. This is where macro photography gets complicated. On your SLR camera, you'll want to select aperture priority mode ("A" for Nikon; "AV" for Canon). Aperture refers to how wide the lens opens when the shutter is pressed. This controls how much light is let into the camera. A large aperture will let in lots of light, but will produce a narrow (short) depth of field; A small aperture will produce a smaller opening of the lens, but a greater depth of field will be achieved. Okay, so far so good. The trick here is to remember that there is an inverse relationship between the aperture number (called the f-stop) and the size of the aperture opening. Thus, the smaller the aperture number, the larger the aperture opening. Thus f/2.8 is a large aperture and will thus produce a very narrow depth of field. An aperture of f/18 is actually a smaller aperture and thus will produce a much deeper depth of field. The most beautiful macro shots use larger apertures (thus a small depth of field) because it produces the best, smoothest bokeh. Again, there's a trade off: you have no idea how paper thin a camera's focus can be until you've tried focusing on a tiny bug using a large aperture. Look at the photo at the top (taken using an aperture of f/5.6), this is a tiny bug, and while the eyes are in focus, the abdomen and antennas are blurry... you can imagine how thin the depth of field would be with f/2.8! A safe bet is to start out using 5.6 or 7.1, but of course it all depends on available light.
5. Shoot away! If you're lazy like I am and insist on handheld macro photography, then set the camera on continuous shooting, and then, when you get your subject in the cross hairs, hold down the shutter release and take a burst of three shots. The hope is that one will be sharper than the others.
6. Practice makes perfect (or perhaps confirms the need for more practice!). Macro photography has a steep learning curve. My advice here is just enough to get you started, but it will take persistent practice and experimentation to become adept at this. There is much, much more that could be said (for instance I haven't said a word about composition and framing), but I hope this will at least help as you get started. Click here for more excellent macro advice.
1. It's about the glass. There's no way around this, you really need a fixed-focal-length macro lens (not a zoom). The common length and speed for macro lenses is 100mm @ f/2.8. The longer the focal length, the easier it is to produce good bokeh --
 bokeh refers to the blurring of the background (I wrote more about this here). The creamier and smoother the background, the better the bokeh. Click on the flower to the right or see yesterday's post -- notice how the backgrounds are softly blurred. It is easier with the longer lenses (100mm, 150mm, 180mm) to produce better bokeh because the field of vision is narrower, making the background easier to control. I started out with a 60mm macro lens, and it was great, it's just that you pretty much had to shove the camera into whatever it was you were trying to capture (which made insect photography very difficult) and the wide focal length made it difficult to control the background. My advice, start out with a macro lens with a focal length of 90mm to 105mm.
2. Avoiding the shakes. You'll need a steady hand, lots of light, a quality flash, and still, lots and lots of patience to get sharp photos. Like I said, the good thing about "longer" lenses is better bokeh, the downside: it's much tougher to steady them. Almost every macro I've ever shot has been handheld -- and that's because I'm lazy and hate the hassle of setting up the tripod. Here are two of my tripod shots - here and here. (I use the tripod so infrequently with macro photography that I can remember which shots were taken using it!). In the absence of a tripod, you need a flash or decent light.
3. The wind is not your friend. It doesn't matter how solid your tripod is, if it's a windy day, it's futile trying to take macros (unless you're taking macros of things firmly rooted or secured!). Even the slightest whisp of a breeze will give you fits.
4. Getting deep. This is where macro photography gets complicated. On your SLR camera, you'll want to select aperture priority mode ("A" for Nikon; "AV" for Canon). Aperture refers to how wide the lens opens when the shutter is pressed. This controls how much light is let into the camera. A large aperture will let in lots of light, but will produce a narrow (short) depth of field; A small aperture will produce a smaller opening of the lens, but a greater depth of field will be achieved. Okay, so far so good.
 The trick here is to remember that there is an inverse relationship between the aperture number (called the f-stop) and the size of the aperture opening. Thus, the smaller the aperture number, the larger the aperture opening. Thus f/2.8 is a large aperture and will thus produce a very narrow depth of field. An aperture of f/18 is actually a smaller aperture and thus will produce a much deeper depth of field. The most beautiful macro shots use larger apertures (thus a small depth of field) because it produces the best, smoothest bokeh. Again, there's a trade off: you have no idea how paper thin a camera's focus can be until you've tried focusing on a tiny bug using a large aperture. Look at the photo at the top (taken using an aperture of f/5.6), this is a tiny bug, and while the eyes are in focus, the abdomen and antennas are blurry... you can imagine how thin the depth of field would be with f/2.8! A safe bet is to start out using 5.6 or 7.1, but of course it all depends on available light.
5. Shoot away! If you're lazy like I am and insist on handheld macro photography, then set the camera on continuous shooting, and then, when you get your subject in the cross hairs, hold down the shutter release and take a burst of three shots. The hope is that one will be sharper than the others.
6. Practice makes perfect (or perhaps confirms the need for more practice!). Macro photography has a steep learning curve. My advice here is just enough to get you started, but it will take persistent practice and experimentation to become adept at this. There is much, much more that could be said (for instance I haven't said a word about composition and framing), but I hope this will at least help as you get started. Click here for more excellent macro advice.
Excellent tips. But it does take a lot of practice in the field to implement them.
ReplyDelete